At the time of this writing, there were only 18 hours to go before the M3D Pro KickStarter campaign ends. And, I just got another update that shows great things are happening with the M3D Pro development.
As part of the email, they sent two images, which I have combined in a short video.
This is just a small sample of the major advancements in FDM 3D printing that are delivered in the M3D Pro. Here is an updated video demonstrating the new "auto-correction" capabilities.
Now, you have to admit. THAT is very cool.
There is so much more to say; but, I will simply send you over to the "Final Week Update" to see the rest of the story. :)
I can hardly wait to get my hands on one, And, you can bet I will be breaking out the microscopes to test, for myself, the ultimate print quality.
NOTE: there is one thing that I hope to be able to improve on and that is the nature of the first layer which uses rather wide lines for adhesion. (See the above link.) I am hoping to be able to achieve a super-smooth bottom layer and that might mean using a 3rd party slicing application. We'll see. What is most refrshing for me is the candor of the Michael Armani and the M3D team as they develop the product and part of that is allowing KickStarter contributers to make requests. Being able to define the first layer will be among my requests.
I am hoping that many of my fellow Cube users will take a serious look at the M3D Pro as their next 3D printer so that we can grow together with that platform as we did on our Cube journey. And, speaking of that, I have created a Cube Software Dropbox folder that should contain all of the various version of firmware and client software just in case you might need it in the future.
I know this is a Cube oriented blog. But, our Cubes won't last forever. So, it's important to see some viable options.
I just finished watching the M3D Live Stream which offered a Q & A session for their Pro KickStarter backers and potential backers.
During the session, they provided a link to a YouTube video that only lasts for a very few minutes; but, speaks volumes! It's an early proof of concept test; but, they clearly can achieve a self-aware 3D printer as promised.
Today, September 8, 2016 at 8:00PM, M3D will be testing Kickstarter's new Live Stream capabilities to communicate directly with people interested in hearing about their new Pro 3D printer.
I don't exactly know how the streaming, which is in beta, works; but, there is a sign-up for participating on M3D's KickStarter Page.
It's an excellent opportunity to ask questions of the M3D team.
For years I have sought a glue that would work better than fingernail polish for attaching PLA. In the quest to find a clear coat to protect 3D printed objects painted with alcohol marker ink, I think I have found it.
It's called Loctite GO2 All-Purpose ink and it does, in fact, bind PLA pieces together.
Loctite GO2 Glue
When dry, it is flexible, much like silicone glue. The drying time to set is about 30 minutes and the full cure time is 24 hours.
The great news is that it can do double duty. Not only does it glue; but, it makes for an excellent clear coat that does not appear to smear alcohol marker ink.
Here's a more complete story on the IdeaRoom3D blog.
By the way, while most of the projects in the IdeaRoom3D blog are printed on an M3D Micro, the mini-blackboard project in which I create a personalized 3D printed chalkboard was printed on a Cube3. The chalkboard paint from Rust-Oleum covered the PLA very well. I tried it with a primer and without. I prefer not to use a primer in the future.
In the short time that I have been working with the eCraft eBrush using Spectrum Noir markers, I have learned a LOT and enjoyed it even more!
This is the latest result.
Surfboard Colorized
It was printed on an M3D Micro in ABS-R and prepared for painting using a flap wheel sanding tool by Dremel and coated with Tamiya Fine Surface Primer before being painted.
The complete story on this process is in 2 articles on my IdeaRoom3D blog.
Because the markers are dye based, the process should work equally well with 3D System's PLA, normal ABS and Nylon. UPDATE ALERT ON M3D PRO
Yesterday, I received two emails communicating the progress of the M3D Pro development for those who are participating in the Kickstarter funding process. I will be writing about this latest news later today, or tomorrow, after I have time to assess the many ramifications of the innovations that will be included in this new M3D 3D printer. But, I can tell you now that M3D definitely gives Cube owners something to consider as their next 3D printer.
I continue to explore potential methods of adding value to 3D prints through colorizing them. For now, I am focused on using the eBrush airbrush system and Spectrum Noir markers. I will get around to testing these with PLA from the Cube; but, for now take a look at the results using flexible Tough 3D Ink from M3D.
When 3D Systems ceased production of the Cube series of printers, I began to explore alternatives.
That's when I became acquainted with M3D and the low-cost Micro 3D printer. At YouthQuest Foundation, we have been experimenting with two of the Micro printers in our 3D ThinkLink lab and I have purchased one for my granddaughters. It is destined to have an important role in our work with at-risk young people. In fact, the YouthQuest Foundation's Board of Directors just approved a fund-raising campaign to purchase M3D Micro 3D printers as
the anchor of a new peer mentoring program for our cadets. So, we plan
to purchase many more.
More importantly, as I studied the company behind the Micro, it was apparent that they were much more than simply a 3D printer manufacturing company. At its heart it is an innovation company. In fact, I was so impressed that I began the IdeaRoom3D blogto feature the M3D line of products.
Several weeks ago, I received an email from M3D that invited me to take part in a video they were creating. Naturally, I jumped at the chance to meet the team at M3D and I am ALWAYS ready to talk about the wonderful benefits of 3D printing.
Today, I received an email that announced the opening of M3D's KickStarter campaign for the new sensor-rich M3D Pro! Following the link, I was pleasantly surprised to see that the video in which I participated is on the Kickstarter page. (I'm the old guy in the red shirt.) :)
But, that is NOT why I am urging you to visit M3D's Kickstarter page.
Normally these days, I would avoid a KickStarter campaign for a new 3D printer like the plague. So many in the recent past have ended badly. But, this one is different. Having been experimenting with the M3D Micro for a while now, I cannot
begin to tell you how excited I am about this new development. I have gotten to know this company and I've used their products which gives me the utmost confidence to pledge my support.
Remember that I said that M3D is more than simply a 3D printer manufacturer and at its heart M3D is an innovation company? That is MORE than evident when one examines the M3D Pro.
I could waste your time by trying to write about all the many features I find appealing about this new, unique 3D printer. But, the M3D KickStarter page does a much better job than I could in presenting all the wonderful new innovations it represents.
I missed out on their first KickStarter campaign for the Micro; but, we're not missing out on this one! Count us in for a pledge!!!
I apologize for doing this to you; but, I'm immediately going to refer you to my new blog ("IdeaRoom3D") that will focus on using M3D 3D printers and materials with an emphasis on classroom applications and creating crafts. If you have been following this blog, it might be useful to you to also follow the new blog.
I am starting a new series that will explore using Craftwell's eBrush airbrush system that primarily uses alcohol markers instead of traditional ink. The goal is to use colorization to add value to the things we print.
While certainly not perfect, both the process (entirely enjoyable) and the results (better than expected) have convinced me that this system is perfect for 3D printing owners. It's relatively easy to use, affordable and applies color quite well to both flexible and hard 3D printing materials. I will also be testing it with the Z450 powder printer. We have found that consumer 3D scanners use relatively low resolution color images so it is worth exploring coloring people scans with an airbrush system.
At any rate.take a look at my first try. The article, with an image, can be found at this LINK.
Not only have they concentrated on bringing this filament to CubePro users, they have exerted a great deal of effort in presenting finishing techniques that are sure to be useful for a wide variety of applications.
Finished 3D Printed Wood Objects
The techniques are outlined in a .PDF available on the Wood Filament product page.
New Nozzle
In order to use the new wood filament, you will need to purchase and install a new "Advanced Nozzle"which costs $99.
Advanced Nozzle
The instructions for installing the new nozzle are also available on the Wood Filament product page.
I wish I could tell you how well it works; but, this new filament came as a complete surprise to me. I can say that it is innovative enough for us to be very interested in using it in YouthQuest's 3D ThinkLink Lab. The Nylon was a game changer and from everything I have learned about the wood filament, it is destined to be a game-changer as well!
For our cadets to be able to design wooden parts that could actually be incorporated into designs of actual wood fixtures is an important step forward in giving them practical and marketable skills.
Last week, I was teaching in the Virginia Beach area and decided, since I was already more than halfway there, that I would make a visit to MakeShaper's headquarters in Sanford, NC. I like to get to know the people behind the products that we use and talk about in this blog. I expected a find evidence of a commitment to quality. But, nothing could prepared me for the lengths to which MakeShaper is making to ensure THE highest quality is delivered to their filament customers. A Tour to Remember
While I can't discuss all the steps that I saw being taken to produce the highest quality product, I can say that they even go so far as to build their own proprietary machinery if that is what it takes to better their peers.\
MakeShaper is a division of Static Control Components, which began in a garage about 30 years ago. They sure have come a long way since then. The facility, which creates 2D printer cartridges as well as the 3D filament that are of interest to us is absolutely massive! Touring the facility is not only enlightening, it's exhausting for an old guy. But, it was well worth it.
Resilience and Perseverance on a Grand Scale
And, speaking of old guys, one of the most impressive aspects of the tour came in the form of a piece of art and a photograph memorializing a day that could have been the end of Static Control Components (SCC). In April of 2011 multiple tornadoes touched down in Sanford and decimated SCC's facilities. The founder of SCC was 75 at the time and the damage was so severe that many though he simply might walk away. But, he did not. They were contacting customers and shipping product in days. Please read this story and view the images of the devastation.
Here is a link to a news video that is well worth visiting if you want to understand the company's character.
MakeShaper for 1st and 2nd Gen Cube & CubePro - More to come
The Makeshaper division is relatively young when compared to the age of parent organization. So, their product line is still growing. We saw 3D printers of virtually every make and model being used to develop and test new products. The current filament choices available for the 1st and 2nd Cube and CubePro are limited to Red, Green, Blue, Black & White in PLA and ABS. But, I expect that more choices will be forthcoming after extensive testing.
More than Just Filament
Joining me on this visit was Jeff Epps of the Richmond County school system just miles from MakeShaper's headquarters. A good deal of the time of the visit was devoted to talking about how 3D design and printing can literally change lives of at-risk students. Both of us came away impressed by what we heard from MakeShaper's management.
They 'get it'.
So, I don't expect that this meeting will be the last time we meet together to talk about our common goals in the communities in which we serve.
Bottom Line for 1st and 2nd Gen Cube & CubePro Owners.
The reason why I made the trip was to see if I could find evidence as to the steps MakeShaper was taking to ensure that we could trust their products in our printers. I came away feeling that they are striving to be the manufacturer of THE most reliable filament available.
The comprehensive testing is there. In fact, the level of testing is so much higher than the industry norm that I cannot even write about it in detail.
The construction is there. Every cartridge contains a bag of moisture protection INSIDE the cartridge for continuous protection. The moisture protection bags are much heavier for additional storage protection.
The price is there. Currently a 2nd Gen Cartridge is just $25 with free shipping for orders over $50.
So, I would urge you to consider trying MakeShaper. And, let me know what you think. After all, the real testing is in YOUR hands. Only you can attest that the MakeShaper alternative is right for Cube owners. But, I trust you will find my assessment to match your own.
I was recently sent a cartridge that fits the 2nd Gen Cube. It came from a company called MakeShaper in North Carolina.
I agreed to test a cartridge and those test have been completed.
Here is the result:
Test Print Using the MakeShaper Filament Cartridge
The first thing i noticed was that the moisture protection bag in which it is contained was much heftier than I am used to seeing. I have had absolutely no problems with the cartridge. Where it differs from the OEM version is that (1) it is held together with screws (T-10 Star) making it very easy to open and (2) it contains a pack of moisture protection tucked inside the cartridge. Nice!
The cartridges for the 2nd Gen Cube are just $25. And, those for the CubePro are just $65. I have not tested the CubePro version. But, at that price is sure looks like it's worth exploring.
While this forum will continue to be primarily devoted to the Cube series of 3D printers, the reality is that we must continue to move forward by considering other options for the continued education of both students and adults. I consider a home 3D printer to be among the most effective educational tools a parent could purchase for their child. Likewise, I consider a 3D printer to be an essential part of a school's mission to grow our children's brains.
So, I have found it imperative to do my best to explore various options to find the optimal price/performance in a 3D printer that satisfies the needs of both parents and educators.
My criteria for evaluation is based on having watched consumer 3D printing develop since its RepRap infancy, having had 6 3D printers covering four different models in my home over the last four years and having now worked directly with more that 30 3D printers spanning 6 educational sites for the last 3 years.
So, the 3D printers that have risen to the top for more in-depth evaluation might surprise many people. It might also be surprising that the two top candidates are at extreme polar opposites when it comes to the reasons why they are of interest to me. At one end of the spectrum is the tiny M3D Micro and at the other end of the spectrum is the JellyBox, a kit printer that is virtually completely unknown at the moment.
While I won't go into depth on either printer in this post, I would like to introduce my two top contenders.
When we think of equipment for education, we usually think of tough, robust and indestructible. The M3D Micro is admittedly quite the opposite. It is small, lightly built and can be easily tossed by a four year old. So, why does it intrigue me as possibly an excellent educational tool for both home and the classroom?
Price is one factor. It can be purchased for as little as $349. But, that, alone, was not enough to make it stand apart. The da Vinci Jr is also $349 and probably has a more rugged design. It is the extremely compact footprint of the M3D Micro that appeals to me... as well as it's low noise factor.
It's hard to teach in a room with the noise of multiple 3D printers drowning out conversation. By all accounts, the M3D is quiet. Plus, the small size of the M3D Micro allows teachers to securely stack and store the printers away. And, for some schools, including those with which I'm involved, that is a critical consideration.
The option of being able to store and use reels of filament internally, under the print table, really makes for a quick transition from secure storage to classroom printing. While there are differences of opinion as to whether the internal filament loading is as effective as the external filament method, the very fact that it is even possible is a serious plus for this small printer.
And, as for the fact that the reels only hold 250 feet, I also consider that a plus. They are only $14-$18 dollars. But, the small reels mean that less filament is exposed to the air and damaging moisture. I cannot tell you how many half-used reels of filament had to be discarded due to moisture in the atmosphere when I had the RapMan 3.2. And, in an educational setting where printing is infrequent, the problem is amplified.
I have not used an M3D Micro as yet. I hope to make a visit to their factory that, like myself, is in Maryland sometime in the very near future so that I can further explore the printer and explore its potential in much greater detail. But, so far, I like what I see from a price/performance point of view.
If you have never heard about the JellyBox, don't worry. Only a handfull of people have. In fact, this kit printer manufactured in Bluegrass, Virgina by iMade3D is still in it's pre-production and testing phase.
A little history is in order....
Shortly after I declared that 3D printer kits were dead, I was approached by a long-time friend and businessman who was interested in 3D printing. It turned out that he was a disgusted by the lack of quality of several kits he had attempted to build and use and wanted to probe my reaction to his idea of wanting to create his own 3D printer kit. Frankly, I told him, based on my own frustrations with the "build experience" that I wasn't interested because building took a lot of the responsibility for the ultimate quality out of the kit manufacturer's hands. From this discussion came the idea that iMade3D would not sell kits. They would sell a mentored build experience where attendees would have factory experts help them build a 3D Printer in a single day. At the end of the day, the attendees would be able to take home a completed and working 3D printer.
To make a long story short, he embarked on that journey with the goal of creating a 3D printer kit that could not only be put together in a single day; but, be made with the highest quality parts. Their first effort was a traditional aluminum frame kit and it came close to meeting that goal. The build was first tested by a dozen people in the YouthQuest 3D ThinkLink Lab where we videotaped the entire process for post-evaluation.
Out of that experience, a remarkable thing happened. A completely new and revolutionary idea was born. They designed a printer frame of laser cut acrylic held together with zip ties!!! Here is Filip Goc, of the father-son design team, introducing the JellyBox.
(Note the mountains of Virginia in the background. Bluegrass is tucked away in the Appalachian Mountains near West Virginia, a beautiful place to manufacture 3D printers.)
I have been involved in 4 test build sessions and have watched the process be refined to the point where we are committed to having our cadets build 4 of them in our next Immersion Class in August.
Here is the second video which Filip mentioned which explain some of the features...
It may be held together with zip ties; but, I can tell you from first hand experience that it prints better than our $5,000+ printers! But, the real reason for my putting this printer at the top of my educational printer list is that it is designed to be put together at the beginning of the school year by the students, who print with it for the entire class session and then simply clip the zip ties to take it apart so that next year's students can also benefit by the build and use experience. Thus, it is probably the first 3D printer kit specifically designed for multiple build experiences. It's a remarkable idea built with uncompromising quality.
And, this glowing assessment is coming from someone that had previously only associated kit printers with frustration and poor quality!
Unlike the M3D, which I have yet to fully embrace, pending more experience, I can whole-heartedly assure you that I am going to devote a lot of energy toward promoting the JellyBox. In fact, have become a part of their team as an advisor. It's actually fun to build and a joy to use.
But, it is not a kit nor business plan based on a mass-market strategy. Supplies will only be available as the demands of quality dictate.
Conclusion
So there you have it. On one end of the spectrum is a small consumer printer with a very appealing price/performance ratio that meets some of the unique requirements of the classroom. And, on the other an absolutely solid 3D printer that not only prints better than any other 3D FDM printer with which I have experience; but, can be built and rebuilt year after year, giving students a comprehensive 3D printing experience.
This post is relevant to all 3D printers using PLA, Nylon or ABS. But, it may be increasingly relevant to Cube printer owners. And, that is the subject of treating and storing filament in a way that provides the least difficulties during printing.
At the YouthQuest Foundation we have scores of Cube printers with an average inventory of 3 cartridges for each printer. The printers are not used on a daily basis. So, learning why and how filament degrades over time has been extremely important for us.
The problem came to the fore when 3D Systems first donated a number of 2nd Gen printers, The printers had been in inventory for a number of years. Even though the supplied filament was in sealed bags with packets of drying agent, all of the filament was brittle and easily clogged the printers. Fortunately, 3D Systems replaced all the filament. But, even this, too, showed some tendency to brittleness. With this in mind, we began to explore exactly why we were seeing what we were seeing. More importantly, we needed to find a solution that would minimize damage while the filament was being stored.
We THINK we have come up with the solution. It involves combining a dehydrating system to proactively remove existing moisture from filament and a sealed storage system with a robust dehydration system.
DEHYDRATION SYSTEM
Since the problem of moisture affecting filament is common to ALL 3D printers, there are a number of new dehydration systems being developed specifically designed for filament. But, the most interesting ones have yet to be released. So, we looked for alternatives. And, they came in the form of food dehydrators. Here is the one that we recommend... the NESCO FD77DT Digital Food Dehydrator:
Nesco FD77DT Food Dehydrator
It is important to purchase a digital dehydrator that allows you to set a precise time and temperature as different types of filament require different times and temperatures. This model can be found for under $80. One of the main reasons we like this brand and model is the way air is distributed ACROSS each layer. We open the Cube2 cartridges and only put the cardboard cartridges in the dehydrator. For Cube 3 cartridges, we open the cover and put the uncovered base and reel in the dehydrator. For our initial tests, we set it at 45C degrees and run it for 4 hours. This could be refined as we gain more experience.
STORAGE POLICY
From now on, we will no longer leave filament in the printers between print sessions... even if it only means leaving it in the printer overnight! The only exception to this are the CubePro printers which we now treat as closed filament storage systems with their own dehydrator.
STORAGE SYSTEM
Some time ago, we had decided to store filament in large plastic boxes with sealed tops and single use moisture remover. But, it turns out that using a simple 5 gallon bucket with a special sealed screw-on top is an even better solution. We go right from the food dehydrator into a bucket.
5 Gallon Bucket
We pair the bucket with a special sealed screw-on top. The Gamma Seal top is the key to the ability to ensure a moisture barrier. Because we wanted to color code our storage, we have purchased both buckets and tops from both Home Depot (Red/White bucket and Black top) and Lowes (Blue bucket and white top).
Gamma Seal Top
The last part of the storage system is a cost effective way to ensure the lowest moisture levels in the bucket. We could use packets, as we previous used with the plastic boxes. But, we found what we believe to be a MUCH better solution, the Lagute Adenium L-A01 Renewable Wireless Mini Dehumidifier.
Lagute Mini-Dehumidifier
The beauty of this system is two-fold. First, it is a perfect size. And, secondly, there is a window that allows you to determine when the beads in the dehumidifier need to be recharged. To recharge the system you simply plug it in over night! We use the same dehumidifier inside the CubePro.
So far, it looks like the dehumidifier takes the relative humidity under 22% in a single day. It may ultimately go lower if I could only resist opening the bucket to check it! :)
MODIFYING THE DRYING RACKS
In order to fit a cartridge into the food dryer, the standard racks with have to be alternated with racks that have been cut to remove the grill. But, extra FD-77DT racks are relatively inexpensive and can be purchased locally at Bed Bath & Beyond. I believe it cost about $14 for a set of two extra racks.
I would not buy the actual NESCO DEHYDRATOR model that can be found on the shelves in Bed, Bath & Beyond Stores. It will work; but, it has no off-on switch or timer. Buy online to get the digital model. Sears seemed to have the lowest price. But, shipping is not as fast as Amazon.
I fully expect that using these tools we may be able to save filament we otherwise might have had to discard.But, at the very least it is going to protect our future filament investments.
At some point, most of us would like to photograph our 3D printed objects. That is certainly true when you write or teach about 3D printing.
While I have a full-frame Canon 5D MK II with professional "L" lenses, most of the time using it for quick photos to post here or to include in my video training materials is just plain overkill. It's a pretty heavy rig and what I usually need is something a bit quicker and easier to handle.
I've used my iPhone and even a GoPro to grab quick images. But, what I really needed was something with a good macro capability that took reasonably good images.
I was finally prompted to action by my daughter's need for a camera with macro capabilities to shoot her artwork.
In the end, we tried two different cameras... one very successfully, the other not.
Let's start with the "NOT".
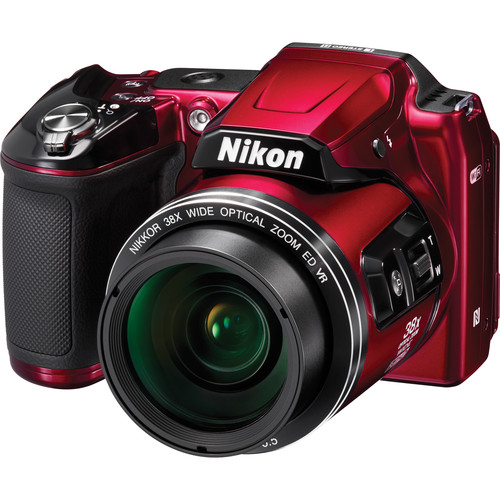
My first choice was the Nikon L840 at $199. The price was certainly reasonable and the lens promised to do exactly what both of us needed. The reticulated screen was also appealing. I had used such a screen on my first serious digital DLSR, the Olympus E-10 ten years ago and knew the value when shooting small objects,
Nikon L840
But, it turned out that focusing the L840 was just plain too slow. After many attempts to get it to work as I needed it to work, I gave up. Besides, it was the first and only camera I had ever used where the preview was in focus; but, the final image was not!!! Even using a tripod and timer to avoid any shake, it seemed to have a problem grabbing a sharp final image.
Unfortunately, by the time I figured that it was not going to be acceptable, it was too late to return it.
To be fair, this may be a defective camera. It happens. So, I will send it in to Nikon to see if it can be improved. But, in the meantime it was time to move on. Now let's turn to the "SUCCESSFULLY".
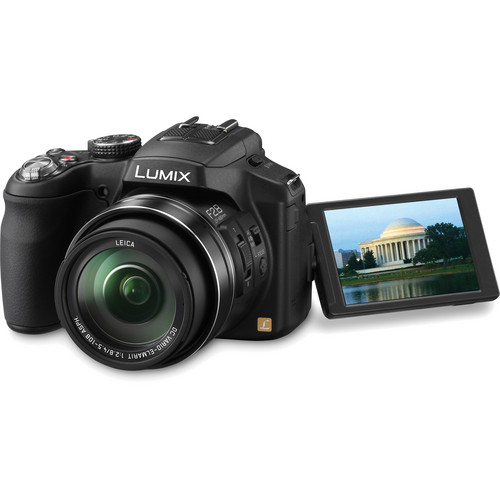
For several years, since I first purchased my Panasonic HC-X920 3MOS Video camera, I have been following Graham Houghton's Youtube channel. While my primary focus was on those offerings related to video, I also knew that he had produced some material on a Panasonic bridge camera called the Panasonic Lumix DMC-FZ200.
Panasonic Lumix DMC-FZ200
I already knew that Graham Houghton was a person that could be trusted when it comes to reviews and evaluations, so I decided to take a close look at this camera he seemed to like so much. I was shocked to find that the Lumix FZ200 was just $47 more than the Nikon L840 and the feature differences would have suggested a MUCH wider price gap! So, I decided to try one.
I could not be happier. While the FZ200 can be operated in fully automatic point & shoot mode, it's comprehensive manual controls make it EXACTLY to right camera for my need to provide my students and you the perfect images to demonstrate 3D printing concepts. Moreover, while it is no $3000 full-frame SLR, it has most of the features I am used to relying on with my professional cameras. The lens, for instance, is f2.8 across the entire zoom range!
You can see from the two images that the L840 does not have a hot-shoe while the FZ200 does. This also make it a good second camera for shooting events or adding an off-camera flash for macro photography. The Nikon L840 only shoots in .JPG; while, the FZ200 shoots in RAW as well as .JPG! All in all, the $47 price difference buys you a LOT more camera!
By the way, the 1080p video (Either MPEG-4 AVCHD or MPEG-4) is stunning for a camera of this price and it can even shoot High Speed Video up to 240 frames per second! That's going to come in handy when documenting 3D printing artifacts and issues!
My Conclusion
Frankly, having owned a wide variety of point & shoot and SLR cameras over many years. I consider the DMC-FZ200 to be THE best value in a camera among all that I've ever purchased.
In fact, if you have never owned an SLR or, are not willing to invest at least an additional $600 in an f2.8 lens, then I would choose the FZ200 over any SLR on the market.At $247, it is an incredible camerafor any level of expertise. I now know why Graham Houghton was so appreciative of it. I join him in being an equally enthusiastic fan.
The Icing on the Cake
All that capability would be worthless without expert guidance to make things easy. And, once again, Graham Houghton has come to the rescue. He has written a fantastic book for novices and professionals on the FZ200 that introduces using the camera in an organized presentation that takes the mysteries out of getting the most out of its features. It's called the The Panasonic Lumix FZ200 User's Manual eBook.
Sooner or later, many of you will be looking for a camera for yourself or a loved one.Before making that decision, I hope you will hop over to Graham Houghton's blog where he covers a variety of photographic topics well beyond the FZ200.You will be very happy you did.
In the meantime, I will be using the DMC-FZ200 to document the super detail of the print from the ProJet 1200 micro-SLA printer. So, stay tuned!
This arrived in my inbox and just in case you missed it, it is very good advice!
Tip for First and Second generation Cube owners
To
get the best performance and to ensure the longevity of your Cube
filament when your printer is not in use or idle, move the Printjet over
to the far right. See the diagram above.
When we set up the 3D ThinkLink Creativity Lab in our YouthQuest Foundation offices, we very specifically decided that, unlike the usual maker spaces, we would concentrate ALL of our energies in providing the ultimate in 3D scanning, design and printing experiences for our at-risk students and their teachers.
Personally, my interests are in line with that focused vision.
But, I have to admit, there is one non-additive product that has captured my imagine in a big way.
It's a desktop laser cutter called Glow Forge.
Glow Forge Laser Cutter
I don't know whether it's the convenient size, the fact that they include an air filter in all but the most basic model (meaning no need for outside venting) or the fact that it has a camera that let's you simply draw your design with a pen or pencil and it will follow it. Perhaps it is all three.
Or, just maybe it's the fact they they call the Glow Forge "The 3D Laser Cutter"!
But, whatever the reason, it's got me salivating over all the fun and creative things it can do.
This is a 3D PRINTING blog. So, I'm not going to write any more. But, I promise you that your creative juices will flow as you read about the Glow Forge laser cutter.
The Cubify.com site is expected to be closed on Jan 16, 2016. From that point on, all of the updates and accessories will be obtained through the 3D Systems web site. Once the changeover is complete I will post the pertinent links.
But, life is a series of passages and as old doors close, new doors open.
One such new door is in the area of 3D Scanning. In particular it involves a whole new breed of ultrabook class computers that include Intel's new RealSense scanner technology.
While the hardware might suggest a single development path, the reality will be quite different. The reason why I believe that the RealSense scanning hardware is simply a launching platform is that there are already mulltiple early teams taking different paths on making use of RealSense to capture 3D scans.
Sense for RealSense, from 3D Systems brings us a Win8/10 app that encapsulates the scanning experience suitable for both local and cloud printing. (An updated link to come after the Cubify move) ItSeez3Dtakes a cloud-based approach. Originally developed for the iSense or Structure scanners, they have ported the app for Win8/10 for 4th generation Haswell Intel Core processor products (or newer) using Intel's RealSense technology.
XYZPrinting recently introduced a handheld USB 3.0 RealSense scanner that is available from B&H Photo for just $168.90! It includes scanning software.
While it doesn't appear on the Creative web site as yet,Creative produced the RealSense cameras for Intel's RealSense pre-release SDK package!
But, the company that prompted me to claim that techniques for taking advantage of RealSense are going to blossom in new directions is CAppASITY.While I have not been able to test the product, Easy 3D Scan, the samples they display are fascinating. It appears they provide the capability of using a Canon SLR with RealSense to producing high fidelity textures! The result look stunning.
I'm a Canon 5D Mark II user, so this REALLY appeals to me. :)
They have other products for scanning rooms and articles. Very interesting.
All of this is brand new so we are just beginning to be able pull back the covers. But, the little we know at this point sure peaks our interest.
I recently purchased the HP Spectre 12-a000 X2 (m3 chip) which is a 12 tablet having the R200 (Rear Facing) Real Sense camera and have already done some testing using Sense for RealSense at the 3D ThinkLink Creativity Lab at our YouthQuest headquarters. We invited cadets from our Youth Challenge classes to take part in a focus-group giving feedback on their scanning experiences comparing the handheld Sense and tablet-based RealSense. Their observations will be published on the YouthQuest site. I'll let you know when it's available. I can tell you we certainly had fun learning to optimize the experience. RealSense is real. :)
We're ready to charge through this new open door! :)